 Haris
You’re printing an important document and suddenly there are lines or streaks across the page. You need to know how to fix printer streaks quickly. The answer is usually simpler than you think. In most cases, running your printer’s built-in cleaning cycle will solve the problem. This guide walks you through everything you need to diagnose and fix printer streaks, whether you have an inkjet or a laser printer.
We’ll cover the common causes of printer streaks, step-by-step solutions for both inkjet and laser printers, and when to call in a professional. By the end, you’ll know exactly what to do when your printer starts leaving marks on your paper.
What Causes Printer Streaks?
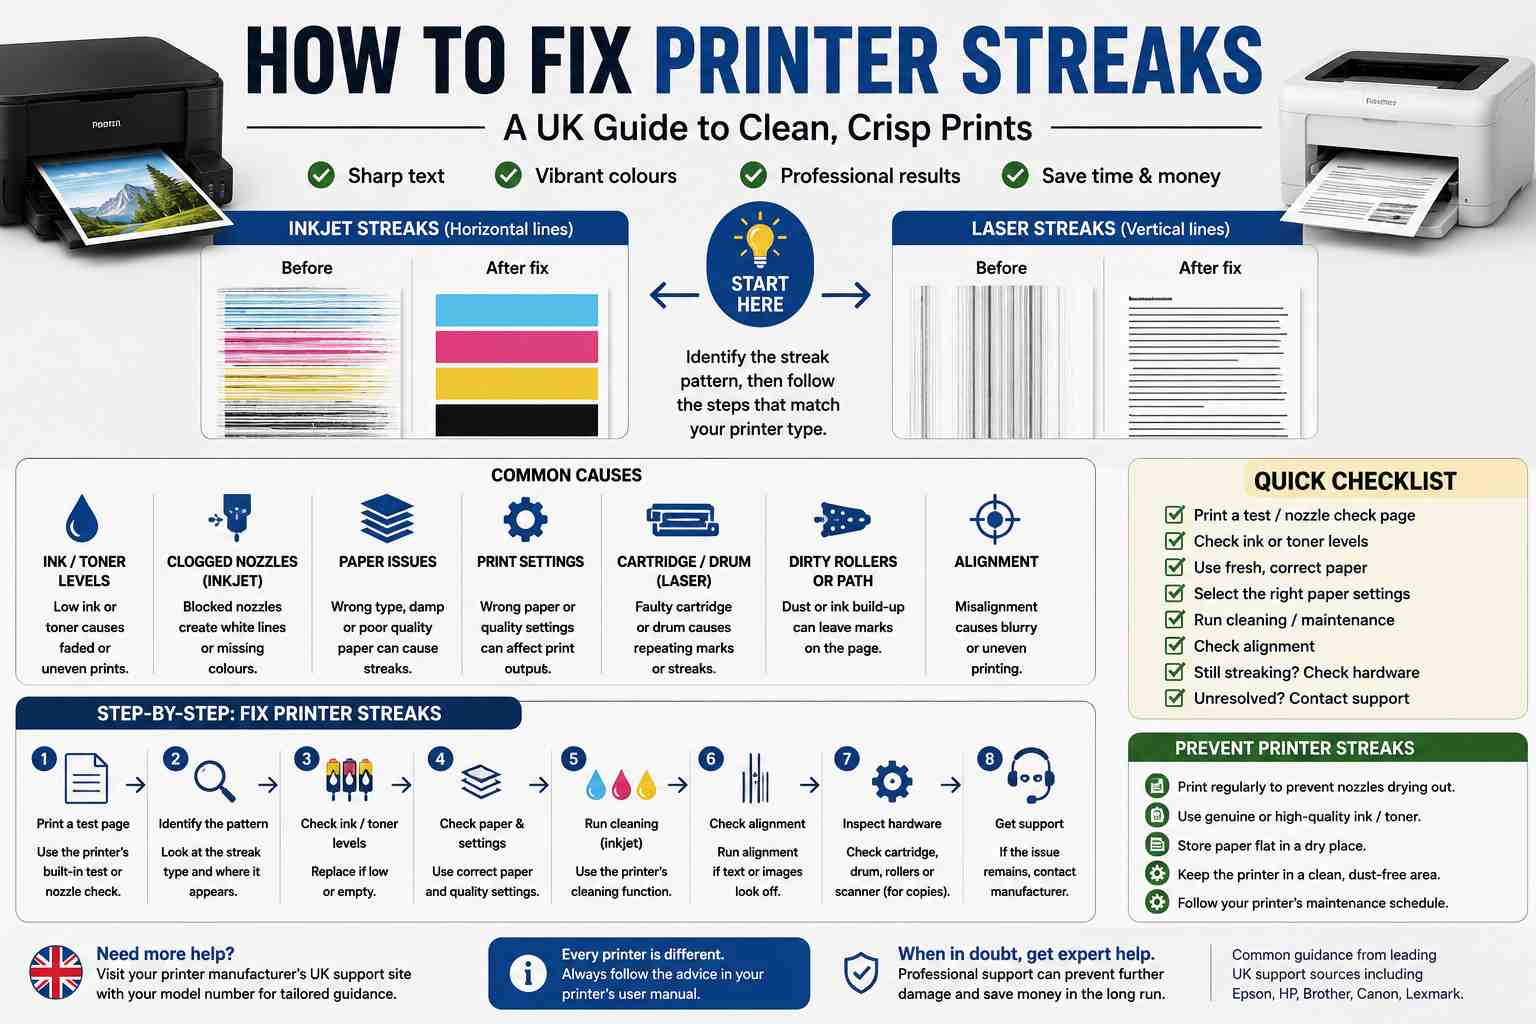
Printer streaks can appear as horizontal or vertical lines, bands, or smudges on your printed pages[reference:0]. The most common cause is a clogged printhead nozzle[reference:1][reference:2]. Here’s a breakdown of the main causes.
- Clogged printhead nozzles: Dried ink or debris blocks the tiny nozzles in inkjet printers, preventing ink from reaching the paper evenly[reference:3][reference:4].
- Low or empty ink or toner cartridges: When cartridges run low, they can’t deliver enough ink or toner, causing faded or streaky prints[reference:5][reference:6].
- Misaligned printhead: If the printhead is out of alignment, the ink may be placed incorrectly, leading to blurry text and lines[reference:7][reference:8].
- Dirty printer rollers or paper path: Dust, paper particles, and ink residue can build up on the rollers, causing smudges and streaks[reference:9].
- Incorrect paper settings: Using the wrong paper type or setting can cause the printer to misfeed, leading to streaks or wrinkles[reference:10][reference:11].
- Damaged drum or fuser (laser printers): In laser printers, a worn drum or fuser unit can cause repeating marks or streaks[reference:12].
How to Fix Printer Streaks: Step-by-Step Guide
Follow these steps in order. Most streaking issues can be resolved with the first few steps.
Step 1: Run the Printer’s Cleaning Cycle
The built-in cleaning cycle is designed to clear clogged printhead nozzles[reference:13]. Access it through your printer’s control panel or the software on your computer[reference:14]. Run the cycle once, then print a test page. If the streaks remain, run the cycle again. Most manufacturers recommend running the cycle no more than three times in a row, as it uses a significant amount of ink[reference:15].
Step 2: Check Ink or Toner Levels
Low ink or toner is a common cause of streaks[reference:16]. Check the levels through your printer’s software or control panel. Replace any cartridges that are low or empty. For laser printers, try gently shaking the toner cartridge to redistribute the toner before replacing it[reference:17].
Step 3: Align the Printhead
If cleaning doesn’t work, run the printhead alignment tool[reference:18]. This recalibrates how the printer lays ink on the page and can fix blurry text and misaligned colours[reference:19]. You’ll usually find this option in the same maintenance menu as the cleaning cycle.
Step 4: Check Paper Settings and Paper Quality
Make sure the paper type setting in your printer matches the paper you’re using[reference:20][reference:21]. Using photo paper when the printer is set to plain paper (or vice versa) can cause streaks. Also check that your paper is clean, dry, and not wrinkled[reference:22][reference:23].
Step 5: Clean the Rollers and Paper Path
Dust and debris on the rollers can cause smudges and streaks[reference:24]. Turn off and unplug your printer. Use a lint-free cloth slightly dampened with water to gently wipe the rollers. For laser printers, run a cleaning page if your printer has that option[reference:25]. If you’re using an inkjet printer and the problem persists, you may need to clean the paper path through the maintenance menu[reference:26].
Step 6: Update or Reinstall Printer Drivers
Outdated or corrupted drivers can cause print quality issues[reference:27]. Visit your printer manufacturer’s website to download the latest drivers. In Windows, you can also go to Device Manager, right-click your printer, and select “Update driver”[reference:28].
[Table: comparison of streaking fixes for inkjet vs laser printers]
| Issue | Inkjet Printer | Laser Printer |
| Clogged nozzles / printhead | Run cleaning cycle; repeat if needed | Not applicable (no printhead nozzles) |
| Low cartridge | Replace ink cartridge | Replace toner or shake to redistribute |
| Misalignment | Run printhead alignment | Check driver settings; update firmware |
| Dirty rollers / paper path | Wipe rollers; clean paper path | Run cleaning page; clean paper path |
| Damaged component | Replace printhead (often built into cartridge) | Replace drum unit or fuser |
How to Fix Printer Streaks on Inkjet Printers
Inkjet printers are the most prone to streaking because their printheads have tiny nozzles that can easily become clogged with dried ink[reference:29]. Here’s a focused approach for inkjet printers.
- Run the cleaning cycle first. This is the single most effective fix for inkjet streaks[reference:30].
- Check the ink levels. Low ink can cause streaks and faded areas[reference:31].
- Use the right paper. Inkjet printers need paper designed to absorb ink properly. Using the wrong paper can cause smudging and streaks[reference:32].
- Clean the printhead manually (if the cleaning cycle fails). Some printers allow you to remove the printhead for manual cleaning. Check your printer’s manual for instructions.
- Consider replacing the printhead. In many HP printers, the printhead is built into the cartridge, so replacing the cartridge also replaces the printhead[reference:33].
How to Fix Printer Streaks on Laser Printers
Laser printers work differently from inkjets. Streaks in laser printers are usually caused by issues with the toner cartridge, drum unit, or fuser[reference:34]. Here’s what to do.
- Check the toner level. Low toner can cause faded streaks[reference:35]. Shake the cartridge gently to redistribute the toner[reference:36].
- Run a cleaning page. Many laser printers have a cleaning page option that cleans the paper path and removes excess toner[reference:37].
- Check the drum unit. A damaged or worn drum can cause repeating marks or streaks. The drum may need to be replaced[reference:38].
- Check the paper type setting. Incompatible paper can cause print quality issues in laser printers too[reference:39].
- Clean the paper path. Use the printer’s maintenance menu to clean the paper path[reference:40].
When to Replace Your Printer Cartridges or Components
Sometimes cleaning and maintenance aren’t enough. Here are signs that you need to replace something.
- Replace ink or toner cartridges if: the printout is faded, you receive a low-ink warning, or cleaning doesn’t improve quality[reference:41].
- Replace the drum unit (laser printers) if: you see repeating marks or streaks at regular intervals, or the printer indicates the drum is at the end of its life[reference:42].
- Replace the fuser (laser printers) if: toner doesn’t fuse properly to the paper, or you see smudging that rubs off.
- Replace the printhead (inkjet printers) if: cleaning cycles don’t resolve the issue and the printhead is not built into the cartridge.
How to Prevent Printer Streaks
Prevention is better than cure. Here’s how to avoid printer streaks in the first place.
- Print regularly. Even a test page once a week helps prevent ink from drying in the nozzles.
- Use the right paper. Always use paper that matches your printer’s specifications.
- Store paper properly. Keep paper in a dry place. Damp paper can cause streaks[reference:43].
- Run maintenance cycles regularly. Many printers have automatic maintenance. Make sure it’s enabled.
- Turn off your printer properly. Always use the power button. This allows the printer to park the printhead correctly, preventing ink from drying out.
FAQs
Q: What causes printer streaks?
Printer streaks are usually caused by clogged printhead nozzles, low or empty ink/toner cartridges, misaligned printheads, dirty printer rollers, or incorrect paper settings. In laser printers, a damaged drum or fuser unit can also cause streaks.
Q: How do I fix printer streaks?
Start by running your printer’s built-in cleaning cycle. If that doesn’t work, check ink or toner levels, align the printhead, clean the rollers, and check your paper settings. For laser printers, try cleaning the paper path or replacing the drum.
Q: Why is my printer printing lines or streaks?
Lines and streaks are often caused by clogged printhead nozzles in inkjet printers. In laser printers, the issue is usually related to the toner cartridge, drum unit, or fuser. Other causes include low ink, dirty rollers, or incorrect paper settings.
Q: How do I clean my printer printhead?
Most printers have a built-in cleaning function. Access it through the printer’s control panel or software on your computer. Run the cleaning cycle once, then print a test page. If streaks remain, run the cycle again up to two more times.
Q: How do I fix vertical streaks on my printer?
Vertical streaks often indicate clogged nozzles or a dirty encoder strip. Run the printhead cleaning cycle and align the printhead. If the problem persists, check that you’re using the correct paper type and that the paper is clean and dry.
Q: Can low ink cause printer streaks?
Yes. Low ink or toner levels can cause uneven coverage, which often appears as lines or streaks on the page. Check your printer’s ink or toner levels and replace any cartridges that are running low.
Q: How do I fix a laser printer with streaks?
For laser printers, start by checking the toner level and shaking the cartridge to redistribute toner. Run a cleaning page if available. If streaks persist, the drum unit or fuser may need replacing. Clean the paper path and check your paper type settings.
Q: How many times should I run the printer cleaning cycle?
Run the cleaning cycle once, then print a test page. If streaks remain, run it again. Most manufacturers recommend running the cycle no more than three times in a row, as it uses a significant amount of ink.